I recently noticed that at some point in the past ~year, Proxmox 8 and Openwrt 23 developed a small compatibility issue, and following the typical tutorials such as this one didn’t work. It turned out to be a simple fix but for completeness I’ll include all the steps necessary to get OpenWRT working. If you only want the fix, go here.
First, download the correct image from the OpenWRT releases page here and make your way to <desired version> /targets / x86 / 64. For example, for 23.05.3, the latest as I write this, the page is here. You want to download the generic-ext4-combined.img.gz file.
root@proxmox:~# wget https://downloads.openwrt.org/releases/23.05.3/targets/x86/64/openwrt-23.05.3-x86-64-generic-ext4-combined.img.gz
--2024-05-04 00:13:36--  https://downloads.openwrt.org/releases/23.05.3/targets/x86/64/openwrt-23.05.3-x86-64-generic-ext4-combined.img.gz
Resolving downloads.openwrt.org (downloads.openwrt.org)... 151.101.2.132, 151.101.66.132, 151.101.130.132, ...
Connecting to downloads.openwrt.org (downloads.openwrt.org)|151.101.2.132|:443... connected.
HTTP request sent, awaiting response... 200 OK
Length: 11333679 (11M) [application/octet-stream]
Saving to: ‘openwrt-23.05.3-x86-64-generic-ext4-combined.img.gz’

openwrt-23.05.3-x86-64-generi 100%[=================================================>]  10.81M  --.-KB/s    in 0.1s

2024-05-04 00:13:36 (90.0 MB/s) - ‘openwrt-23.05.3-x86-64-generic-ext4-combined.img.gz’ saved [11333679/11333679]
Then decompress the file:
root@proxmox:~# gunzip openwrt-23.05.3-x86-64-generic-ext4-combined.img.gz
gzip: openwrt-23.05.3-x86-64-generic-ext4-combined.img.gz: decompression OK, trailing garbage ignored
Then resize the image to however much space you want. OpenWRT being designed to run on routers doesn’t require much, so 1GB is fine in my case.
root@proxmox:~# qemu-img resize -f raw openwrt-23.05.3-x86-64-generic-ext4-combined.img 1G
Image resized.
Create a virtual machine in Proxmox in the typical way with the following settings:
- No CD drive/installation media
- Guest OS: Linux 6.x-2.6 kernel
- Default graphics card
- Machine: q35
- SCSI Controller: VirtIO SCSI single
- BIOS: Default (SeaBIOS)
- Qemu Agent: checked
- Don’t add any disks (will do this soon) and delete the default scsi0
- CPU: 2 cores, default settings except Type = host or as desired. Should be more than enough.
- Memory: 1024MB, Ballooning device checked. OpenWRT is not memory intensive.
- Network: depends on your setup. You may want a device here or only use PCI pass-through adapters.
Then, import the disk at the command line to your new VM. The format is:
qm importdisk <VM ID #> <resized image file name> <storage destination>In my case, with VM 102, and with a local storage called local-lvm:
root@proxmox:~# qm importdisk 102 openwrt-23.05.3-x86-64-generic-ext4-combined.img local-lvm
importing disk 'openwrt-23.05.3-x86-64-generic-ext4-combined.img' to VM 102 ...
Logical volume "vm-102-disk-0" created.
transferred 0.0 B of 1.0 GiB (0.00%)
transferred 17.0 MiB of 1.0 GiB (1.66%)
<...>
transferred 1.0 GiB of 1.0 GiB (100.00%)
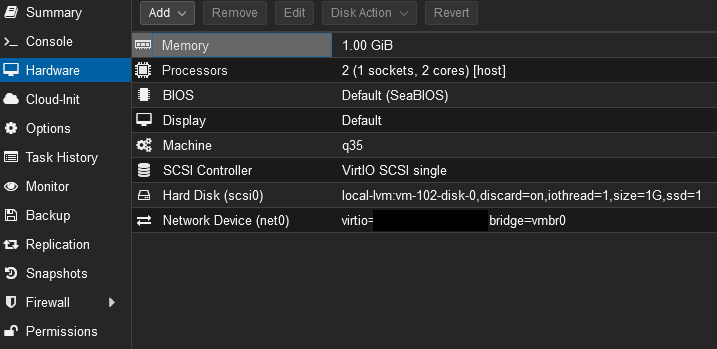
Successfully imported disk as 'unused0:local-lvm:vm-102-disk-0'Go back to your VM configuration, and on the hardware page edit “Unused Disk 0” and edit the parameters as suitable for your storage. In my case, as I have an SSD, I enable “Discard”, “IO Thread” and “SSD Emulation”. I also double check to make sure SCSI Controller is “VirtIO SCSI single”. Finish by clicking “Add”.
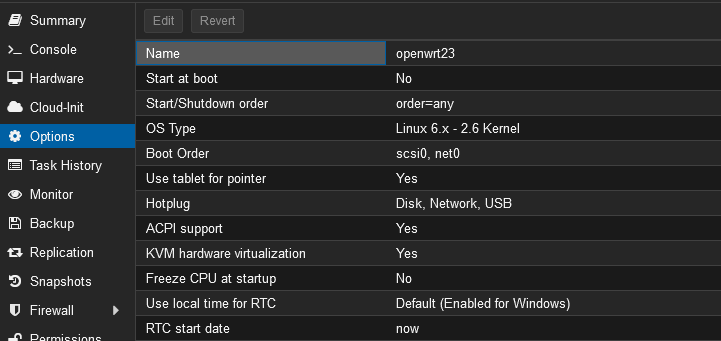
The last step is one not mentioned in previous tutorials and which I believe to be new. Go to Options in the VM configuration and edit your boot order to enable “scsi0” as the first or second boot device as desired. By default, it is completely ignored and your machine will thus not boot into OpenWRT. In a more typical VM install, it is enabled by default, which threw me off as I almost never have a reason to modify the boot order. I can only guess importing a disk manually screws up Proxmox 8 in some way.
Finally start the VM and it should boot. In my case, excluding the GRUB bootloader, it takes about 6 seconds:

Have fun!